Kaity's corner: Magnemite modifications
For the past year and a half or so, my nephews have been pretty in to Pokemon. Cards, toys, binders for their cards, and my sister made an incredible Pokeball cake for one of their birthday parties! So I decided that they were all going to get handmade Pokemon plushies for their birthdays.


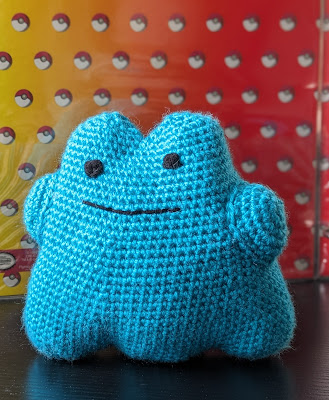


Robert got Ditto...

William got Polywag...

...and Andrew got Wooper!

My friends all love Pokemon too, and when I showed them what I'd been making for my nephews, a few of them wanted some plushies of their own. Matt asked for a Shiny Ditto (essentially a special, more powerful version - so he's a different color from the standard version that Robert got):

And Dana asked for Magnemite.

Unfortunately, the pattern that I most wanted to make has been discontinued due to pattern thieves stealing the free and wonderful work by Frog and Fasten, and then charging for it.
 |
| Frog and Fasten's work - isn't it darling?? |
I ended up purchasing a pattern on Ravelry written by Andrea Schroeder. But I decided to make a a few tweaks, so that it looked more like Frog and Fasten's version. Since my tweaks were re-writes of Andrea's pattern, I thought I would write them up and share them with you! But first, I want to be clear that I am in no way trying to say that a) Andrea's work isn't good enough, or b) I'm better than Andrea. Far from it! I would not have known how to make anything but the spherical body and circular eye without Andrea's pattern. I simply wanted a slightly different look in a few places.
For starters, I liked the way Frog and Fasten did the big eye. So while I followed the stitch count for the body exactly, I did the whole body in grey. Then, I made the eye as a separate piece and sewed it on, with the body turned on its "side" - my first stitches are at the top, underneath where I eventually sewed the large screw. To make the eye, I did a simple circle pattern:
- magic ring; 6 sc inside the ring, pull tight, do not sl st (6)
- sc inc in all sts around (12)
- *sc in the next st; sc inc in the next. Repeat from * all the way around (18)
- *sc in the next two sts; sc inc in the next. Repeat from * all the way around (24)
- *sc in the next three sts; sc inc in the next. Repeat from * all the way around (30)
- *sc in the next four sts; sc inc in the next. Repeat from * all the way around (36)
- sc in each st around (36) join with a sl st, fasten off, leaving a long tail for sewing. do not sew onto body yet!
Before I attached the eye to the body, I surface crocheted some slip stitches using black yarn to make the happy little arc. I did this in the spaces between rows 4 and 5, following the curve of the circle about halfway around.
I made a very subtle change to the small screws and the magnets by doing one of the rows in the back loops (BLO). For the screws, I did this in round 3. For the magnets, I did this in rows 3 and 29. Doing this, instead of crocheting into both loops as standard, allows those pieces to have a slightly flatter edge, which I think looks more accurate to the original Pokemon designs found on cards, the games, and the show.
My other change was the large screw on top of Magnemite. I first made Andrea's version, but I wanted a bigger screw, both wider and taller.
- magic ring, 6 sc inside the ring, pull tight, do not sl st (6)
- sc inc in all sts around (12)
- *sc in the next st; sc inc in the next. Repeat from * all the way around (18)
- *sc in the next two sts; sc inc in the next. Repeat from * all the way around (24)
- *sc in the next three sts; sc inc in the next. Repeat from * all the way around (30)
- BLO sc around (30)
- in both loops again: *sc in the next three sts; sc dec across the next two. Repeat from * all the way around (24)
- *sc in the next two sts; sc dec across the next two. Repeat from * all the way around (18)
- *sc in the next st; sc dec across the next two. Repeat from * all the way around (12)
- *sc in the next st; sc dec across the next two. Repeat from * all the way around (9)
- BLO sc around (9)
- BLO sc around (9)
- BLO sc around (9)
The last tiny change that I made is that for the small screws, I embroidered the Xs on the tops using a sport weight yarn instead of the same worsted that I made everything else with. Not a huge difference, but if you want to make yours look like mine, that's a detail that's worth mentioning!

And there you have it! If you want to use my adaptations to Andrea's pattern to make a Magnemite of your own, you can purchase Andrea's pattern on Ravelry here. It's £0.99 GBP - when I bought it, the conversion rate was $1.29 USD. I know the conversion rate varies day to day, so you might pay a few pennies more or less.
If you're here as a follower and not as a fellow crocheter, and you want a Magnemite of your own (or any of the other Pokemon featured in this post, or really any Pokemon in existence!), please feel free to reach out for a custom commissioned order! You can fill out my contact form here, or reach out on any of my social media accounts to find out pricing and lead time.
Have you ever modified a pattern that you paid for, and if so, how did it go? Which Pokemon would you like to see me make next? Let me know in the comments!

.jpg)

Comments
Post a Comment